Posted on

Here, There, Everywhere

Reflections from a recent Expedition

We’ve all attended a meeting, taken a course, or read an article that moved us no further than to pique our interest. Putting new insights into action is the payoff for attention spent. And we multiply that payoff if we take a moment to reflect on a more broad understanding of the concept or technique we found so interesting.

Objective of play

Here, There, Everywhere emerged so that workshop participants might detail – sometimes in front of the room, sometimes just to themselves – how they will change their behavior once they return to work.

Source

Here, There, Everywhere was created by David Mastronardi and Eric Wittenberg

Number of Players

Everyone in the meeting

Duration of Play

3 – 5 minutes for reflection and commitments

+10 minutes for sharing and discussion

Material Required

  • Content to review (a wall of post it, digital canvases, notes taken, a…powerpoint presentation?!)
  • Post-it notes (digital or analog)

How to Play

  1. Begin by telling your particpiants you’re going to take a moment to reflect and crystalize a learning from the material you just covered.
  2. Ask them to take a moment to go back and review whatever that material is, so that the content is once again fresh.
  3. After the review, have each participant then capture the following, one per post-it note:
    1. Here something in our time together that caught your attention, piqued your curiosity or, at the very least, you noticed. It might be a game, a comment from a fellow participant, a concept, a visual framework, etc… 
    2. There how you might take that specific example and implement it at work or in your personal life. Bring in as much detail as you can to make for easy implementation; imagine your future self doing it and the outcome it generates.
    3. Everywhere would be a generalized interpretation of this thing that would allow for more universal application – an underlying principle absent context
  4. Optional: Break participants into small groups to discuss their reflections. After the breakout, ask the group to share their reflections.

An example, from one of our training Expeditions:

  • HereSquiggle Birds quickly and simply helps adults overcome feelings of fear and inadequacy related to drawing
  • There: In next month’s workshop with the product team I’m going to add Squiggle Birds to the agenda
  • Everywhere: Workplace norms and culture keep drawing from being more widely adopted; people mistake this for lack of ability. This falsehood is easily overcome with a simple game. I wonder what other false narratives our culture promotes and how they might be addressed?

Strategy

It’s a common meeting pitfall to either rush or entirely forego the closing phase. In some meetings, closing refers to making decisions and commitments as a team, or identifying next steps and action items. In other meetings, closing is an opportunity to reflect on what just happened and find meaning in personal development. You might use Here, There & Everywhere in either case; but however you close, give it the time it deserves.

Related Games

Here, There and Everywhere can be used after any game or meeting.

Posted on

JourneyFolio

JourneyFolio's timeline slide homepage. The timeline is segmented into four categories, Personal Highlights, Education and Learning, Side Projects and Professional Path
Raquel’s JourneyFolio timeline page

Looking for a job can be stressful. The many unknowns keep us guessing. Even when it’s updated, our resume or CV feels inadequate, incompletely representing who we are. Companies require them, but they’re often too sterile; we want to share in more dimensions the projects we’ve done, our skills and abilities and the little details that make us us. We want to tell our story.

Objective of play

JourneyFolio is a framework that can help you structure your journey and portfolio, putting your own narrative on it.

The structure was designed on Google Slides (take a look at the tutorial and have full access here). This work is licensed under the Creative Commons Attribution-ShareAlike 4.0 International License because you should have have total freedom to explore this framework as you wish by using the same license.

Source

JourneyFolio was designed and created by Raquel Félix. You can see her JourneyFolio here, and watch her talk about it in this video interview.

Number of Players

Of course, this is your JourneyFolio but it might be helpful to involve others:

  • involve others who have interest in updating their resume; this might be a good activity to do together
  • JourneyFolio reaches beyond the typical boundaries of a standard CV or resume; you might want to involve family, friends, classmates and colleagues who know you well to help fill out your swim lanes.

Duration of Play

Anywhere from a few hours to a few weeks; take your time to get JourneyFolio right. Tell the story you want to tell by including all your life hilights replete with documented evidence: pictures, quotes and links. It might take some time to pull it all together. JourneyFolio is never quite complete.

Material Required

  • Google Slides (preferred) or other presentation software with inter-slide linking capabilities
  • Artifacts of your highlights and achievements: photos, certificates, plaques, badges, ribbons, medals, resume, CV, yearbooks, scrapbooks, journals, notebooks, report cards,
  • Your mom might prove useful

How to Play

Your JourneyFolio timeline grid
  1. It starts with a timeline in a grid where you can draw different layers, for example:
    1. Personal Highlights – This is challenging! Here, you get to tell personal things that you think can help others to better understand your B side. Remember all those adjectives that we like so much to put on the curriculum: “I’m creative, collaborative, a fighter, a this, a that…”. Choose some nice episodes and put it in words and pictures. 
    2. Education and Learning – Yes, it’s about school, college, university, but it’s not just that. You can add any type of extra learnings (relevant seminars, masterclasses, MOOCs, a lecture…) or extra activities during your schooling (which you consider to be important learning moments).
    3. Side Projects – A blog, a hidden music career, volunteering, cooking for others, pop-up parties, a flashmob, a beautiful video you made to your friends, landscape photography… so many things (choose the ones that you really like and share them by telling a story). 
    4. Professional Path – All the places that you’ve been as a worker. Maybe you’ve changed a thousand times (I had ?), maybe you’ve been working in the same place for centuries (you must have a good reason), it doesn’t matter. Share your actions, thoughts, projects, and what was your role in each one of them. It’s more about you than it is about the job, keep that in mind.
  2. Fill in the slides with all the stories of each corresponding moment in the timeline grid. On each slide, you have a HOME button, this will allow you to return to the main timeline grid – you just add a hyperlink to your home page – see the hyperlink tutorial for Google Slides. 
a quadrant of different template types color coded to match the timeline homepage
Match your slide template colors to the layers you use on your timeline
  1. It’s time to add some colour to your timeline grid! Start by identifying with a sphere (or not… you can use emoji, squares, you name it) the stories that you wrote for each moment. 
  2. Add a hyperlink to each specific point (relate it to the slide that connects the story to the point). 
  3. That’s it! Now it’s up to you, explore your own JourneyFolio freely (you can take a look at Raquel’s JourneyFolio for some extra inspiration).

Strategy

Research shows recruiters look at your resume for an average of 7.4 seconds. This necessary document might get you an interview but will not set you apart from the competition. JourneyFolio lets you easily communicate a more complete story in an elegant format sure to leave an impression. You don’t need to be a capital C creative to have a portfolio; built on Google Slides JourneyFolio opens up this document to anyone who wants one.

Related Games

Adapt these games to spark your memory:

Posted on

Choose your words wisely

Humans live in language. It defines what we do, how we do it, and why we do it. Language is the bedrock of our cultures and societies. As with fish in water, we go about our daily business without paying much attention to the language around us and how it influences us. Information architect and author, Jorge Arango developed Semantic Environment Mapping years ago to make visible the everyday language through which we so naively swim.


A completed Semantic Environment Canvas
A completed canvas

Object of Play
The Semantic Environment Canvas will help you understand the language, rules, and power dynamics that make it possible for people to accomplish their purposes in particular situations—or hinder them from doing so.

Number of Players
1-6 players.

If you have more than six people, consider breaking them into groups and assigning separate environments to each group.

Duration of Play
20 minutes – 40 minutes

Materials Required
To run a good session, you will need:

  • A large print of the Semantic Environment canvas. Preferably on A0 size. A1 – A3 will do the job. Downloadable here
  • Flip chart paper with adhesive backing
  • Duck tape
  • Sticky notes of different colors
  • Markers and pens
  • Camera to capture the results
  • It may be helpful to read more about Semantic Environments in Jorge’s blog posts here and here

How to Play

  1. Print out the Semantic Environment canvas on a large sheet of paper and hang on a wall with the duck tape. (It’s easiest if you do this exercise using sticky notes — especially if you’re collaborating with others.)
  2. Inform the players we’ll be filling out canvas sections one-at-a-time. For each section we will individually brainstorm and then conduct a group conversation.
  3. Facilitation tip – if an insight or thought aligns better to another section of a canvas simply place it in the appropriate section and return to it at a later time, i.e. do not discard it because it was in the “wrong” section

The Environment

  1. Ask the players to take 2 – 3 minutes to brainstorm characteristics of the environment. As prompts, ask them to consider the following:
    • What is the general area of discourse we are designing for?
    • Does it employ the language of law? commerce? religion? Etc.
    • What are the intended purposes of this environment?
    • What are the environment’s key terms, including its basic metaphors?
  2. Discuss as a group and agree on a name for the environment. The name should be clear, but also compelling; you want the language to come alive!
  3. Write the name on the canvas.

The Actors

  1. Now let’s think about the actors in the environment. Inform the group these could be individuals, but they can also be roles or groups within an organization. (More than two actors can participate in a semantic environment. For the sake of simplicity this canvas focuses only on two. You can print out additional canvases to map other relationships.)
  2. Ask the group to individually brainstorm all the actors or roles they envision in the situation. Brainstorming prompts:
    • Who are the people performing within the semantic environment?
    • How well do they know the environment’s rules?
    • How well do they know the environment’s language?
  3. After 2-3 minutes, ask the group to discuss their thoughts. From the discussion, have the group choose and name Actor A and Actor B; fill in the canvas.
  4. Ask the group to discuss the relative power of each actor in the situation. Are they peers, or is one actor more powerful than another? How do the actors experience their power differentials?
  5. Fill in the Power Relationship section of the canvas.

Their Goals

  1. Move to the goals section of the canvas. Ask to the players to individually brainstorm why they think the actors might participate in this environment; write one thought per sticky note. Begin with Actor A. After a few minutes, ask the players to focus on Actor B. Some prompts for the brainstorm:
    • Why are they having this interaction?
    • What do they expect to get out of it?
    • How will they know when they’ve accomplished it?
  2. After the brainstorm, ask each player to present their ideas by placing their sticky notes on the canvas. After all players have presented their ideas, let the group discuss.

The Rules

  • Now let’s consider the rules that govern the situation. Explain to the players that these rules can be spoken or unspoken.
  • Ask to the players to individually brainstorm the rules for each Actor; write one rule per sticky note. Begin with Actor A. After a few minutes, ask the players to focus on Actor B. Brainstorm prompts:
    • Are the actors expected to behave in some ways?
    • Are there behaviors the actors are expected to avoid?
    • What happens when they don’t follow the rules? (Does the communication break down entirely? Or do they shift to another semantic environment?)
  • After the brainstorm, ask each player to present their ideas by placing their sticky notes on the canvas. After all players have presented their ideas, let the group discuss.

The Key Words

  1. Move on to the Key Word section of the canvas. Ask the players to consider the key words the actors use in the situation. Explain: All semantic environments have what Neil Postman called a technical vocabulary: words that have special meaning within this environment.
  2. Ask to the players to individually brainstorm the Key Words for each Actor; write one per sticky note. Begin with Actor A. After a few minutes, ask the players to focus on Actor B. Brainstorm prompts:
    • What are the environment’s basic terms?
    • What metaphors could apply to this environment?
  3. After the brainstorm, ask each player to present their ideas by placing their sticky notes on the canvas. After all players have presented their ideas, let the group discuss. Group discussion prompt:
    • Who controls the environmental metaphors?
    • Do both actors share an understanding of what these words mean?
    • Who or what is in charge of maintaining the definitions?

The Touchpoints

  1. Move on to the Touchpoints section of the canvas. As the players to consider the key touchpoints that allow the communication to happen.
  2. Ask to the players to individually brainstorm the touchpoints for each Actor; write one per sticky note. Begin with Actor A. After a few minutes, ask the players to focus on Actor B. Brainstorm prompts:
    • Do the actors meet in person?
    • If so, do they have to be in a special physical environment?
    • If they meet remotely, are there particular technologies involved?
    • What is the mood surrounding the touchpoint?
  3. After the brainstorm, ask each player to present their ideas by placing their sticky notes on the canvas. After all players have presented their ideas, let the group discuss.

The Analysis

Now that the canvas is complete, you can analyze relationships between different sections and discuss their implications.
Questions to help make sense of it all:

  • Is there potential for ambiguity over what sort of environment this is? What can create such confusion?
  • What are the purposes that are actually being achieved by the way this environment is currently organized?
  • Is there a difference between what is intended and what is being achieved?
  • Are there contradictions in purpose between the environment and its sub-environments?

Tips for visualizing the analysis:

  • Draw arrows between sticky notes to clarify relationships around words, rules, goals, and so on.
  • Use colored stickies to represent whether certain words, goals, rules, etc. help (green) or hinder (red) the actor’s goals.
  • Identify and explore related semantic environments. In a single process (for example, a sales pipeline) one actor may transverse various environments as he or she interacts with other actors. Also, semantic environments can be nested: some environments contain sub-environments where language and rules become ever more specialized.
  • Pin up multiple semantic environment maps next to each other; this can help you spot situations in which the same words appear under different guises or with different meanings.

Strategy
When collaborating, people must be clear they’re using language in the same ways. However, they often take the words they use for granted; they don’t question their meaning. Other collaborators may understand them differently.
Mapping the semantic environment clarifies the language people use and the expectations they bring to an interaction. (In other words: always and everywhere!)

For example:

  • Your team may be struggling to communicate effectively with other teams in your organization; mapping the semantic environment may lead you to discover you’re unwittingly using similar words in both teams to mean different things.
  • You may be facing a difficult political environment. Mapping out the semantics of the situation can help you understand other people’s goals and trigger phrases so you can manage tensions more effectively.
  • You may be designing a complex software system and need to understand how the various parties involved — including the system’s users and stakeholders — use language to accomplish their goals. This understanding can then inform the system’s conceptual models and information architecture.

Credits
The canvas is adapted from Neil Postman’s semantic environment framework, and inspired by the canvases of Dave Gray and Alex Osterwalder.

The canvas was originally published on jarango.com

Posted on

Draw Toast


Object of play
You can use the Draw Toast exercise to introduce people to the concepts of visual thinking, working memory, mental models and/or systems thinking. This also works as a nice warm-up exercise to get people engaged with each other and thinking visually. Plus, it’s fun!

Number of players
Any number of people can play this game.

Duration: 10-15 minutes.

How to play
On paper or index cards, ask people to draw “How to make toast.”

After a couple of minutes, ask people to share their diagrams with each other and discuss the similarities and differences. Ask people to share any observations or insights they have about the various drawings. You are likely to hear comments about the relative simplicity or complexity of the drawings, whether they have people in them, how technical they are, how similar or different they are, and so on.

Depending on why you are doing the exercise you may want to point out the following:

  • Note that althought the drawings are all different, they are all fundamentally correct. There are many ways to visualize information and they all enrich understanding rather than being “right” or “wrong.”
  • Although the drawings are different in content, they tend to be similar in structure. That is, most drawings of mental models tend to contain three to seven elements, connected by lines or arrows.

Strategy
The main point of this exercise is to demonstrate the power of visual thinking to represent information.

Visualizations of this kind tend to be easily understandable, although they are visually as rich and diverse as people. Pictures can be fundamentally correct even though they are quite different. There is no “one right type” of visualization.

When people visualize a mental model, they usually will include 5-7 elements, linked together by lines or arrows. The number of elements tends to correspond to the number of things people can hold in their working memory, also known as short-term memory (See The Magical Number Seven, Plus or Minus Two for more information).

This is also a nice warm-up exercise that is fun and gets people talking to each other.

There is an excellent TED talk by Tom Wujec which you may want to watch in preparation. It may also be useful to show to the group in sessions as a way to share insights after the exercise. Tom also has a page with ideas for extending this exercise into group problem-solving which you can find at DrawToast.com.

The Draw Toast exercise was created by Dave Gray

Posted on

Building partnerships

Object of play: The partnership canvas is a tool that enables visualization of current and/or future partnerships. It can also be used for early testing of the value creating potential of a partnership between two partnership candidates. The tool’s purpose is to define your business priority for partnering, and empathize with your partner to explore whether there is potentially a match. The partnership canvas can be used as a stand-alone tool, but comes to full strategizing value when it is jointly used with the business model canvas, also available on this site.

Bart Doorneweert & Ernst Houdkamp www.valuechaingeneration.com

Number of players: This can be done by yourself, but preferably with 2 teams of max 5 people representing each side of the partnership. Alternatively, make multiple pairs if there are more people.


Duration of play: 
(60-90 min):

– Step 1- Define intent (15 min)

–Step 2- Design partnership (15 min/sketch)

–Step 3- Bring teams to the negotiating table (15 min)

–Step 4- Evaluate the negotiation results and define next steps (20 min)


How to play

1. Define intent
a)    Describe the aim or goal of the partnership for your business
b)    List what would be ideal partners to work with and why. Organize a post up. Select a top partnership candidate, or multiple candidates.
c)    Create (multiples of) 2 teams; 1 representing your business, 1 for a potential partner’s business.

2. Design partnership
a)    Each team identifies their desired assets in their respective partner’s business model
b)    Teams sketches out a partnership canvas from their own team’s perspective using stickie notes to define each building block

3. Bring teams to the negotiating table
a)   Each team presents their partnership canvas
b)   Compare the two partnership canvasses by mirroring the partnership perspectives. Compare between  value offers of one team, to desired value of the other team, and whether there is mutual understanding of the transfer activities. Check for a clear fit.
c)   Create agreement on the created value for each partner. Adapt partnership canvas and iterate step 3 if required.

4. Evaluate the negotiation results and define next steps
a)   Do the elements of created value provide clear added value to each partner’s business?
b)   Define next steps to effectuate the partnership


Mirroring partnership perspectives

Strategy: The partnership canvas can be used to explore the idea of engaging in a partnership. A team can use the canvas to prepare for an upcoming conversation with a potential partner. Alternatively the session can be conducted jointly with a potential partner if there is already a mutual interest to explore partnering possibilities. The tool can firstly be used to determine whether there is a technical fit between two businesses. By working in teams and negotiating certain rivalry is always invoked, and teams can also get a sense of cultural fit between two partnering businesses.

In order to obtain full strategizing value from use of the canvas, it is advised to integrally work with the business model canvas. In the end, the partnership discussion is a key step in business model innovation

 Interaction Partnership Canvas  Business Model Canvas

Posted on

Agile UX Sketching and Scrum

Last-Import-09-300x300“Use a picture. It’s worth a thousand words.” That was the advice of Arthur BrisbaneEditor The Syracuse Post Standard March 28, 1911. Despite originally referring to newsprint, the adage still holds true in the digital age.

Sketching for understanding” is an efficient and effective way to gather tons of ideas in a short period of time while cultivating shared understanding across agile teams. With the right structure and active participation, sketching with Scrum teams can really pay dividends throughout the release life cycle.

Use the following guide to help plan and facilitate your next agile sketching session. Continue reading Agile UX Sketching and Scrum

Posted on

Do, Redo & Undo

Object of Play

When creating something, it’s easier to think in the affirmative. We think in a vector of taking actions and building things, and can forget that over time undoing those same decisions can be just as important. Do, Redo & Undo asks a group to focus on this, and to think through the implications of dismantling and altering.

This is a useful exercise in developing any human-to-machine or human-to-human system.  Software provides myriad cases of undoing: users need to change configurations, fix mistakes, and remove software entirely. Business processes need to address this equally well: components need to change or dissolve, and often this flexibility is lost without clarity on how it is done.

Number of Players

Small groups

Duration of Play

1 hour or more, depending on the complexity of the existing

How to Play

The Best-Case Scenario

Generally, the group would run this exercise after they have a concept or prototype as a starting point.  In the case of software, it may be a user story or feature list; in a process,  it may be a draft of the flow.

The group should be given time to walk through and digest this example. The exercise opens with the group brainstorming answers to a simple question: “What mistakes can and will be made?”

Using Post-Up, the group brainstorms a set of items on sticky notes and pools them to create a starting set of scenarios to explore “undoing and redoing.” It’s not unusual for a few humorous items to make the list. Other questions to consider asking in fleshing out the set include:

  • “What would happen if a group of monkeys tried to use it?”
  • “What happens if we pull the plug? Where is the plug?”

The Worst-Case Scenario

In generating the initial list in Post-Up, the group has identified at least one Worst-Case Scenario. Their task now is to address the items by focusing on three possible solutions:

  • Do: Change the design or plan to avoid the problem altogether. This takes the issue off the table.
  • Redo: Provide a means for altering action while it’s being taken. This may be a course correction or a buffering of the situation’s impact.
  • Undo: Provide a means for completely undoing an action and returning to a previously known state. This completely abandons the scenario.

A group that has a large number of items in the Worst-Case Scenario may wish to prioritize them by likelihood and then focus on the hot spots. There is an implied order of preference in Do, Redo & Undo. A problem that can be entirely eliminated by changing the design avoids needing a “redo” or “undo” solution. For example, a feature that asks the user to enter her contact information might be eliminated entirely, if the information can be fetched from somewhere else.

As the group works through Do, Redo & Undo, they should capture their solutions and revisit the original Best-Case Scenario. Their draft of solutions should accompany the design as it matures, eventually proving itself in user testing and the real world.

The Do, Redo & Undo game is credited to James Macanufo.

Posted on 2 Comments

Design The Box

Object of Play

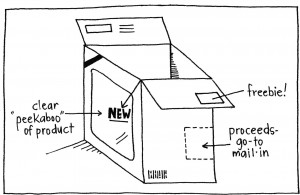
Before you begin, focus on the end. In this exercise, teams create the physical “box” that sells their idea—whether that idea will ultimately become a tangible product or not. By imagining the package for their idea, the teams make decisions about important features and other aspects of their vision that are more difficult to articulate.

This game is popular among software developers when setting out to capture the customer’s view of a new application, but its use doesn’t stop there. The game can help facilitate any vision-oriented discussion, and has been used to describe topics ranging from “our future methodology” to “the ideal hire.”

In all cases, the box is a focusing device: it wraps up a lot of otherwise intangible information into a nice physical object, prompting decisions along the way. When teams present or “sell” their boxes to each other, a number of things come to life, including the natural translation of features into benefits. Also, it’s fun to do. The results of the exercise may be simple drawings or an actual box, which may live on well after as a friendly reminder of the big picture.

Number of Players

Although the exercise may be done with a small group, teams working in parallel on different boxes will result in a more robust discussion during the “selling phase.”

Duration of Play

1 hour or more, depending on the number of groups and depth of discussion.

Setup

Although paper and markers will work for drawing a box, don’t hesitate to bring heavier craft supplies to bear. Consider acquiring blank white cardboard boxes from an office supply or mailing store.  Markers, craft paper, stickers, tape and scissors are all worth the investment.

It may help get the group’s creative gears moving by having sample boxes handy.  Cereal boxes, with their free prize offers, bold imagery and nutritional information, are good thought starters. Likewise, plain “store-label” boxes, gift boxes and toy boxes offer a range of voices. A group that is heavily entrenched in the business-as-usual paradigm will benefit the most from having this inspiration at hand.

How to play

The exercise moves through three phases: an introduction, box creation and sharing by “selling.”

Phase One: Fill the Box

Before a group can jump into creating a box, they need to reflect on what could be in it. To get people oriented, consider laying out some building blocks:

  • Possible names of the idea
  • Possible customers, end users, or buyers
  • Possible features, functions, or other important defining details.

This may be familiar ground, or it may be entirely new to the group. They key in setting up the exercise is to give teams “just enough” information to feel comfortable starting.

Phase Two: Make the Box

Give the teams a set amount of time, 30 minutes or more, to create the box for their idea.  Ask them to imagine coming across the box on a retail shelf, shrink-wrapped and ready for sale. In designing the box, teams may be helped by a few of these prompts:

  • What’s it called?
  • Who’s it for?
  • What’s its tagline or slogan?
  • What are its most compelling features? Benefits?
  • What imagery would make it stand out to you?

Teams may self-organize naturally; most participants will want to create their own box regardless of how they’re arranged. Make sure you have ample supplies for them to do so, and make sure they know that there is no wrong way to create their box.

During the game, there may be questions from medicine or about , you cannot use the description for drugs, this is against the rules.

Phase Three: Sell the Box

Each team or individual should be offered the chance to stand up and “sell” their boxes back to the group. It may be worthwhile to keep a timer for these stand-up presentations, and consider offering a prize to the team that does the best job “selling” their box back to the group.

Look for a naturally occurring breakthrough as they present back their boxes. People put features on the box, but when they sell them, they translate those features into benefits.  Listen for the phrases “so that” or “because,” which bridge otherwise mechanical features into living benefits.

The exercise works well as an open-ended, divergent process, but may be run so that the teams converge on an agreed-upon, shared box. If agreement and alignment is a desired outcome of the exercise, note the differences and similarities in how each team interpreted their box. Build on the common ground captured in the similarities, and isolate differences for discussion. Consider running a second round, this time incorporating these agreements into a final shared box.

In any case, if there is a prize to be awarded for the best “box seller,” make sure it’s the teams that cast the votes. And have enough prizes so that if the box was created by a team everyone on the team will have a prize.

Strategy

Keep the boxes and display them in a prominent place. These may be more valuable (and visible) artifacts than any other documentation that comes out of the exercise. It may also be beneficial to record the presentations the teams give around their boxes, if it is not disruptive to the flow of the group.

The core act of “designing the box” may be altered to work for different contexts and participants.

This exercise goes by many names, and there are a number of good sources to look to for its variations. This version is based on and adapted from the game Product Box in Luke Hohmann’s book, Innovation Games: Creating Breakthrough Products Through Collaborative Play. Other sources point to Jim Highsmith of the Cutter Consortium, and to Bill Shackelford of Shackelford & Associates with the origination of the concept.

Posted on 1 Comment

Understanding Chain

Object of Play

Communicating clearly and effectively is a challenge when there is a lot to say to a lot of people.  It can be tempting to try to explain “everything all at once” to an audience and fail in the process.  In the Understanding Chain game, a group shifts from a content focus to an audience focus, and draws out a meaningful, linear structure for communication.

Number of Players

1–10

Duration of Play

30 minutes to 2 hours

How to Play

To set up the game, the group needs to develop two things: an audience breakdown and a set of questions.

The audience(s):  If there are a large number of audiences, break them down into meaningful groups.  The groups could be as broad as “Corporate leaders” or as specific as “The guys in IT who fix the laptops.”  As a rule of thumb, the more specific the audience, the more tailored and effective the understanding chain will be.  Each audience group will need its own understanding chain. This list of audiences could be created as a result of a Who Do exercise (see Chapter 4).

The questions: Once the group has a clear picture of their audience, it’s time to brainstorm questions. The questions frame what people really want to know and care about. Questions are best captured in the voice or thoughts of the audience, as they would ask them. They may sound like:

  • “What’s cool about this? Why should I care?”
  • “How is this related to x, y, or z?”
  • “What makes this a priority?”

Or, they may be more specific:

  • “When does your technology road map converge with ours?”
  • “How will it impact our product portfolio?”

The questions will become the links in the understanding chain.  To generate them, the group puts itself in the mindset of the audience and captures the questions on individual sticky notes (see the Post-Up game in Chapter 4 for more information).

Play begins by sorting the questions in a horizontal line on a wall or whiteboard.  This is the timeline of a communication, from beginning to end. The group may choose to:

Arrange the questions in a simple story format.  In this understanding chain, the group clusters questions under three headings, from left to right:

  • Situation, which sets the stage, introduces a topic and a conflict
  • Complication, in which further conflict is endured and decisions are made
  • Resolution, in which a course of action is chosen which leads to a result.

By constructing the understanding chain as a story, the group may find the “climax”—the most critical question that leads to the resolution.

Arrange the questions in an educate-differentiate-stimulate format.  In this chain, the group arranges the questions from left to right, moving from:

  • Educate, in which a topic or idea and its parts are introduced
  • Differentiate, in which parts of the topic are contrasted to create a basis of understanding
  • Stimulate, in which actions are asked for or proposed.

Arrange the questions as a conversation. In this chain, the group thinks through or role-plays a conversation with the audience and arranges the questions in an order that flows naturally. Although all conversations are different, one framework to consider is:

  • Connecting:  “What’s up?”  “What do we have in common?”
  • Focusing:  “What’s important right now?” “What do you know about it?”
  • Acting:  “What should we do?”

Strategy

An understanding chain, like any chain, is only as strong as its weakest link. By examining the questions as a whole, the group may uncover an area that needs work or find the “tough questions” that are not easy to answer.  A group that tackles the weak questions, and has the courage to answer the tough ones directly and honestly, will win.

The Understanding Chain game was developed by Dave Gray as part of XPLANE’s consulting approach.